Third-Party Storage Support
SUSE Virtualization now supports provisioning of root volumes and data volumes using external Container Storage Interface (CSI) drivers. This enhancement allows you to select drivers that meet specific requirements, such as performance optimization or seamless integration with existing internal storage solutions.
The SUSE Virtualization team has validated the following CSI drivers:
-
Longhorn V2 Data Engine:
driver.longhorn.io -
LVM:
lvm.driver.harvesterhci.io -
NFS:
nfs.csi.k8s.io -
Rook (RADOS Block Device):
rook-ceph.rbd.csi.ceph.com
These validated CSI drivers have the following capabilities:
| Storage Solution | VM Image | VM Root Disk | VM Data Disk | Volume Export To VM Image | VM Template Generator | VM Live Migration | VM Snapshot | VM Backup |
|---|---|---|---|---|---|---|---|---|
Longhorn V2 Data Engine |
✔ |
✔ |
✔ |
✔ |
✔ |
✔ |
✖ |
✖ |
LVM |
✔ |
✔ |
✔ |
✔ |
✔ |
✖ |
✔ |
✖ |
NFS |
✔ |
✔ |
✔ |
✔ |
✔ |
✔ |
✖ |
✖ |
Rook (RADOS Block Device) |
✔ |
✔ |
✔ |
✔ |
✔ |
✔ |
✔ |
✖ |
|
Support for third-party storage equates to support for provisioning of root volumes and data volumes using external container storage interface (CSI) drivers. This means that storage vendors can validate their storage appliances with SUSE Virtualization to ensure greater interoperability. You can find information about enterprise-grade storage solutions that are certified to be compatible with SUSE Virtualization in the SUSE Rancher Prime documentation, which is accessible through the SUSE Customer Center. |
Prerequisites
To enable SUSE Virtualization to function well, use CSI drivers that support the following capabilities:
-
Volume expansion (online resizing)
-
Snapshot creation (volume and virtual machine snapshots)
-
Cloning (volume and virtual machine clones)
-
Usage of Read-Write-Many (RWX) volumes for Live Migration
Create a SUSE Virtualization cluster
SUSE Virtualization’s operating system follows an immutable design, meaning that most OS files revert to their pre-configured state after a reboot. Therefore, you might need to perform additional configurations before installing the SUSE Virtualization cluster for third-party CSI drivers.
Some CSI drivers require additional persistent paths on the host. You can add these paths to os.persistent_state_paths.
Some CSI drivers require additional software packages on the host. You can install these packages with os.after_install_chroot_commands.
|
Upgrading SUSE Virtualization causes the changes to the OS in the |
Install the CSI driver
After installing the SUSE Virtualization cluster is complete, refer to How can I access the kubeconfig file? to get the kubeconfig of the cluster.
With the kubeconfig of the SUSE Virtualization cluster, you can install the third-party CSI drivers into the cluster by following the installation instructions for each CSI driver. You must also refer to the CSI driver documentation to create the StorageClass and VolumeSnapshotClass in the SUSE Virtualization cluster.
Configure the SUSE Virtualization cluster
Before you can make use of SUSE Virtualization’s Backup & Snapshot features, you need to set up some essential configurations through the SUSE Virtualization csi-driver-config setting. Follow these steps to make these configurations:
-
Login to the SUSE Virtualization UI, then navigate to Advanced → Settings.
-
Find and select csi-driver-config, and then select ⋮ → Edit Setting to access the configuration options.
-
Set the Provisioner to the third-party CSI driver in the settings.
-
Next, Configure the Volume Snapshot Class Name. This setting points to the name of the
VolumeSnapshotClassused for creating volume snapshots or VM snapshots.

|
Backup currently only works with the Longhorn v1 Data Engine. If you are using other storage providers, you can skip the Backup VolumeSnapshot Class Name configuration. For more information, see Virtual Machine Backup Compatibility. |
Use the CSI driver
Once the CSI driver is installed and the SUSE Virtualization cluster is configured, an external storage solution can be used in tasks that involve storage management.
Virtual machine image creation
You can use an external storage solution to store and manage virtual machine images.
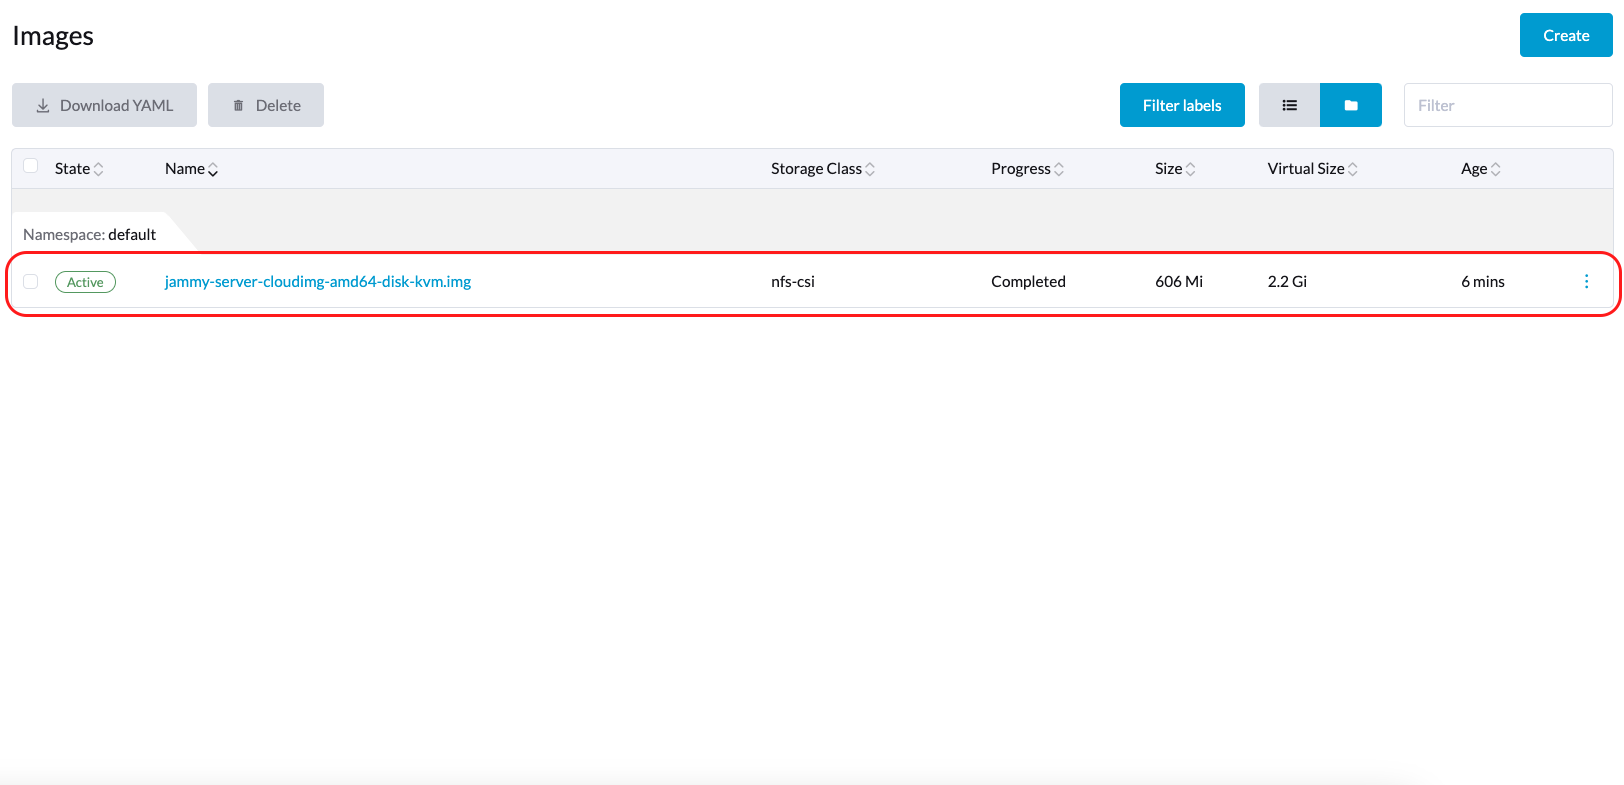
When uploading a virtual machine image using the SUSE Virtualization UI (Image → Create), you must select the StorageClass for the external storage solution on the Storage tab. In the following example, the StorageClass is nfs-csi.

SUSE Virtualization stores the created the image in the external storage solution.
Virtual machine creation
Your virtual machines can use root and data volumes in external storage.
When creating a virtual machine using the SUSE Virtualization UI (Virtual Machine → Create), you must perform the following actions on the Volumes tab:
-
Select a virtual machine image stored in the external storage solution, and then configure the required settings.
-
Add a data volume.

In the following example, the root volume is created using NFS, and the data volume is created using the Longhorn V2 Data Engine.

Volume creation
You can create volumes in your external storage solution.
When creating a volume using the SUSE Virtualization UI (Volumes → Create), you must perform the following actions:
-
Storage Class: Select the target StorageClass (for example, nfs-csi).
-
Volume Mode: Select the corresponding volume mode (for example, Filesystem).

Advanced topics
Storage profiles
You can now use the CDI API to create custom storage profiles that simplify definition of data volumes. Storage profiles allow multiple data volumes to share the same provisioner settings.
The following is an example of an LVM storage profile:
apiVersion: cdi.kubevirt.io/v1beta1
kind: StorageProfile
metadata:
  name: lvm-node-1-striped
spec:
  claimPropertySets:
  - accessModes:
    - ReadWriteOnce
    volumeMode: Block
status:
  claimPropertySets:
  - accessModes:
    - ReadWriteOnce
    volumeMode: Block
  cloneStrategy: snapshot
  dataImportCronSourceFormat: pvc
  provisioner: lvm.driver.harvesterhci.io
  snapshotClass: lvm-snapshot
  storageClass: lvm-node-1-striped
You can define the fields to override the default configuration. For more information, see Storage Profiles in the CDI documentation.
Limitations
-
Backup support is currently limited to Longhorn V1 Data Engine volumes. SUSE Virtualization is unable to create backups of volumes in external storage.
-
There is a limitation in the CDI which prevents SUSE Virtualization from converting attached PVCs to virtual machine images. Before exporting a volume in external storage, ensure that the PVC is not attached to workloads. This prevents the resulting image from getting stuck in the Exporting state.

NFS CSI driver deployment
|
You can deploy the NFS CSI driver only when the NFS server is already installed and running.
If the server is already running, check the |
-
Install the driver using the
csi-driver-nfsHelm chart.$ helm repo add csi-driver-nfs https://raw.githubusercontent.com/kubernetes-csi/csi-driver-nfs/master/charts $ helm install csi-driver-nfs csi-driver-nfs/csi-driver-nfs --namespace kube-system --version v4.10.0 -
Create the StorageClass for NFS.
For more information about parameters, see Driver Parameters: Storage Class Usage in the Kubernetes NFS CSI Driver documentation.
apiVersion: storage.k8s.io/v1
kind: StorageClass
metadata:
  name: nfs-csi
provisioner: nfs.csi.k8s.io
parameters:
  server: <your-nfs-server-ip>
  share: <your-nfs-share>
  # csi.storage.k8s.io/provisioner-secret is only needed for providing mountOptions in DeleteVolume
  # csi.storage.k8s.io/provisioner-secret-name: "mount-options"
  # csi.storage.k8s.io/provisioner-secret-namespace: "default"
reclaimPolicy: Delete
volumeBindingMode: Immediate
allowVolumeExpansion: true
mountOptions:
  - nfsvers=4.2
Once created, you can use the StorageClass to create virtual machine images, root volumes, and data volumes.
Known issues
Infinite image download loop
The image download process loops endlessly when the StorageClass for the image uses the LVM CSI driver. This issue is related to the scratch volume, which is created by CDI and is used to temporarily store the image data. When the issue exists in your environment, you might find the following error messages in importer-prime-xxx pod logs:
E0418 01:59:51.843459       1 util.go:98] Unable to write file from dataReader: write /scratch/tmpimage: no space left on device
E0418 01:59:51.861235       1 data-processor.go:243] write /scratch/tmpimage: no space left on device
unable to write to file
kubevirt.io/containerized-data-importer/pkg/importer.streamDataToFile
    /home/abuild/rpmbuild/BUILD/go/src/kubevirt.io/containerized-data-importer/pkg/importer/util.go:101
kubevirt.io/containerized-data-importer/pkg/importer.(*HTTPDataSource).Transfer
    /home/abuild/rpmbuild/BUILD/go/src/kubevirt.io/containerized-data-importer/pkg/importer/http-datasource.go:162
kubevirt.io/containerized-data-importer/pkg/importer.(*DataProcessor).initDefaultPhases.func2
    /home/abuild/rpmbuild/BUILD/go/src/kubevirt.io/containerized-data-importer/pkg/importer/data-processor.go:173
kubevirt.io/containerized-data-importer/pkg/importer.(*DataProcessor).ProcessDataWithPause
    /home/abuild/rpmbuild/BUILD/go/src/kubevirt.io/containerized-data-importer/pkg/importer/data-processor.go:240
kubevirt.io/containerized-data-importer/pkg/importer.(*DataProcessor).ProcessData
    /home/abuild/rpmbuild/BUILD/go/src/kubevirt.io/containerized-data-importer/pkg/importer/data-processor.go:149
main.handleImport
    /home/abuild/rpmbuild/BUILD/go/src/kubevirt.io/containerized-data-importer/cmd/cdi-importer/importer.go:188
main.main
    /home/abuild/rpmbuild/BUILD/go/src/kubevirt.io/containerized-data-importer/cmd/cdi-importer/importer.go:148
runtime.main
The message no space left on device indicates that the filesystem created using the scratch volume is not enough to store the image data. CDI creates the scratch volume based on the size of the target volume, but some space is lost to filesystem overhead. The default overhead value is 0.055 (equivalent to 5.5%), which is sufficient in most cases. However, if the image size is less than 1 GB and its virtual size is very close to the image size, the default overhead is likely to be insufficient.
The workaround is to increase the filesystem overhead to 20% using the following command:
# kubectl patch cdi cdi --type=merge -p '{"spec":{"config":{"filesystemOverhead":{"global":"0.2"}}}}'The image should be downloaded once the filesystem overhead is increased.
|
Increasing the overhead value does not affect the image PVC size. The scratch volume is deleted after the image is imported. |
Related issue: #7993 (See this comment.)